![OGT logo-2.png]](https://support.offgridtrailers.com/hs-fs/hubfs/OGT%20logo-2.png?width=150&height=150&name=OGT%20logo-2.png)
In General Bolt checks
As outlined in the Owners Manual, the Evolution Series Suspension system periodically requires maintenance. Within the first week of use, torque of all bolts must be checked; refer to the owners manual. Subsequent to this, after 4 months, the same check, and then yearly. It's recommended that these fasteners be checked after EVERY off road excursion where severe loading is encountered.
Bushings and "Noise"
Bushing Lubrication and inspection as required in the event you encounter bushing "noise"; generally a result of overlubricating low maintenance bushings. WD40 is recommended periodically by the manufacturer of the bushings and our troubleshooting guide is referenced here.
General
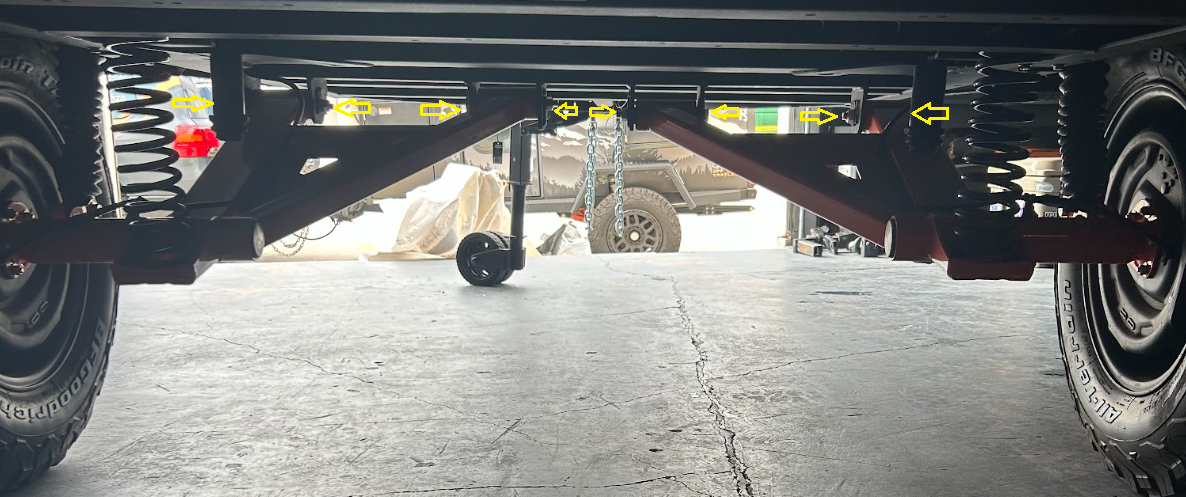
- Toe and camber adjustment is accomplished by the same "eccentric" cam bolts at the control arm attachment points
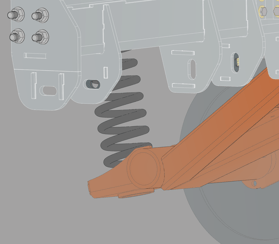
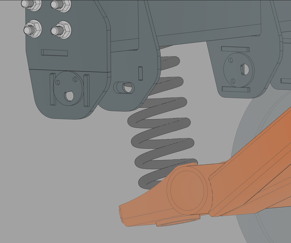
- The eccentric cam bolts are also locked in place to improve bolt retention and ensure that, when correctly fitted, the cam bolts are securely fixed within the pivot arm assembly
- The outer "wheel side" cam bolt is used for toe-in/out adjustment and the inner for camber adjustment
Installation & Alignment Procedures
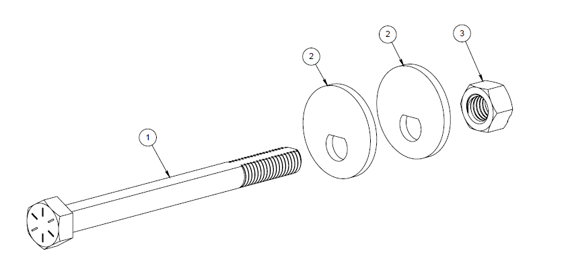
This procedure describes the recommended fitment of the eccentric cam bolts and fasteners specific to the Evolution Series Suspension A-arms
Quick Reference
- Loosen A-arm cam bolts
- Align frame assembly and remove the locking fastener. Utilizing the A-arm slot, check wheel alignment in both toe and camber directions (see below) and if necessary adjust by rotating the appropriate A-arm fastener to achieve the following (see below for Wheel alignment procedure):

- Toe In/Toe out setting adjustment
-
- The outer "wheel side" cam bolt is adjusted using a spanner to achieve the following factory SPEC:
- Toe In Factory Spec = 1/16" Toe in per side
- The outer "wheel side" cam bolt is adjusted using a spanner to achieve the following factory SPEC:
- Camber setting adjustment
- The inner cam bolt is adjusted using a spanner to achieve the following factory SPEC:
- Camber Factory Spec = 0 degrees <-> +0.5 degrees
- The inner cam bolt is adjusted using a spanner to achieve the following factory SPEC:
-
- Once settings are acheived
- fasten the two nuts on either A-arm to the following torque setting
- MUST DO: The Torque wrench must be applied to the NUT as the cam BOLT must not turn
- 183 lb ft torque
- fasten the two nuts on either A-arm to the following torque setting
Wheel Alignment Procedure
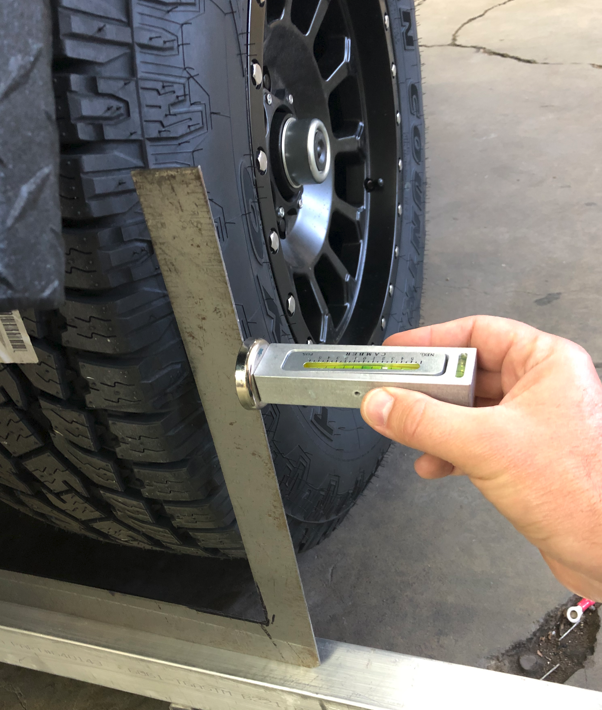
- Place the trailer on a smooth level surface and, if possible, at typical operating load (weight).
- Move the trailer forwards and backwards to eliminate twist in the wheels
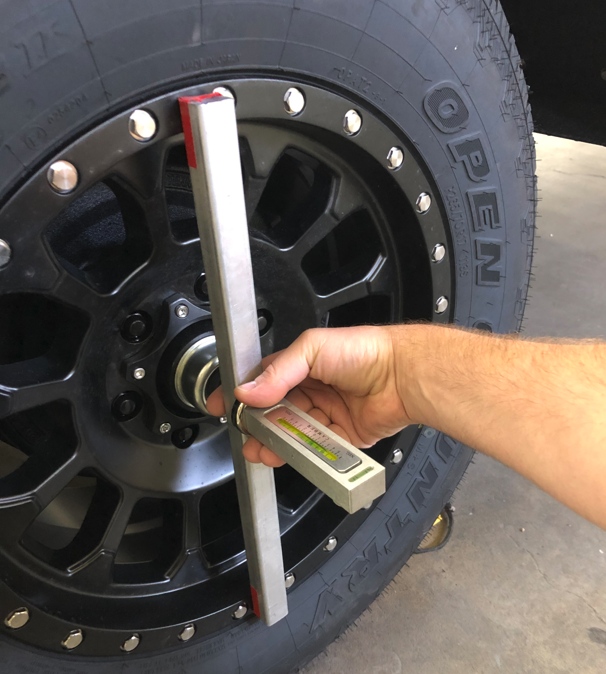
- Toe in:
- Run a straight edge across the face of the tire and measure the distance from the straight edge to the frame outboard rail
- INSERT IMAGES

- *note it is also possible to measure the alignment directly from the brake drum face to the outboard frame rail if the trailer is lifted with wheels removed. This will not take into account gear load as mentioned above
- Run a straight edge across the face of the tire and measure the distance from the straight edge to the frame outboard rail
- Camber:
- using a digital level on the rim, set the camber to the above noted factory spec to avoid excessive tire wear (positive camber is where the top of the wheel is leaning away from the trailer)
- exact measurements will depend on the type and loading configurations
- Camber alignment tool reference
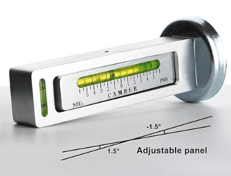
- IF no level floor is available, calibrate the wheel face level but referencing 90 degree angle to the shop floor as outlined below.
- IF a level floor is available proceed to Step d.
- using a digital level on the rim, set the camber to the above noted factory spec to avoid excessive tire wear (positive camber is where the top of the wheel is leaning away from the trailer)
d. Level Floor utilize camber setting directly from wheel face.
Note that tire wear issues are NOT covered by the OGT manufacturers warranty and it is the responsibility of the trailer owner to verify camber and toe measurements as well as all torque specs outlined in the owners manual and above.
Brake Assembly References:
TRP International catalogue guide
Refer to Timbren Article for Brake and bearing service references (common)
Common Question on OGT trailer brakes and wheel offsets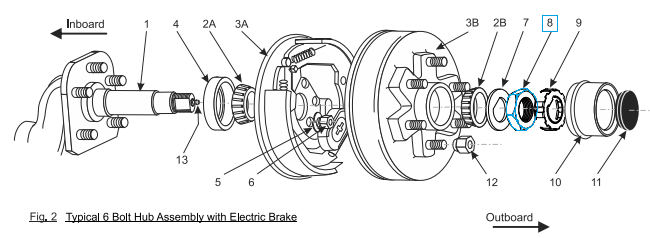
The above item 8, the axle nut, can be used to take slack out of the hub bearing assembly. Just the same as with the mounting bolts, the torque of this bolt should be checked if there is any lateral movement in the wheel assembly when the tire/wheel is raised from the ground. Free spinning of the assembly must also be confirmed.