![OGT logo-2.png]](https://support.offgridtrailers.com/hs-fs/hubfs/OGT%20logo-2.png?width=150&height=150&name=OGT%20logo-2.png)
First, you'll need tools - read this entire document and familiarize yourself with the process, which product you are installing, and what needs to be done so that you can grab what you need. Here's the entire list:
- 13mm or 1/2" combination wrench
This can mount the awning to the awning brackets, and also can be used for mounting the tent mounting rails to 1 1/2" square aluminum members of roof rack.
- 9/16" wrench x 2 or one wrench and one socket, or wrench/socket and crescent/adjustable wrench
These are used to mount the awning brackets to the 1 1/2" square aluminum members of the roof rack.
- 10mm wrench
This tool is used to fasten the roof top tent mounting channel to the tent.
- Drill bits: 7/16" plus 1/8" pilot
- Center punch
- Hammer
- Awning mounting bracket or measuring tape
First, the awning. You'll need the proper hardware. Break down your kit and check!
The awning brackets mount to the trailer with:
4 x 3/8" hex bolts, 2 1/2" long
8 x 3/8" flat washers
4 x 3/8" hex nuts

**The above 3 items are not provided by the awning manufacturer with the mounting kit! The above image shows cadmium plated hardware, you may have stainless steel.
**It is important also that you have a copy of and or have downloaded a copy of the awning install manual!
There are also:
12 x M8 hex head bolts
12 x M8 nylock nuts
These are included with the awning mounting kit. You will only need qty 8 of each. These hold the awning to the bracket. In case you don't have the 23Zero instructions, at each end of the awning cover there are velcro straps that you can undo, this allows for the M8 bolts to be slid into T slots for infinite fore-aft adjustability. Start with the awning installed towards the rear, and then unfold the awning, check position, and move forward (after re-folding the awning) if required.

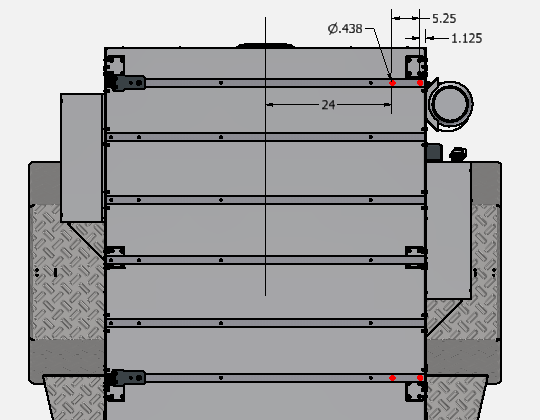
The above diagram shows the M8 bolts holding the awning to the bracket, with 4x nuts per bracket (your kit may only have sufficient fasteners to use 3x M8 bolts and nuts per bracket, this is also suitable) and the 2x 3/8" bolts fastening the bracket through the pre-drilled holes on the passenger, or right hand side of the roof rails. Every roof rail has these holes, but only the forwardmost and rearmost are used in our mounting system - we use 2 out of the 3 supplied 23Zero brackets:

If you are mounting an awning on the driver's or left side of the trailer, there are no predrilled holes. In order to drill these holes, you will need a centering punch, a 1/8" drill bit for a pilot hole, and a 7/16" drill bit to clear the 3/8" fastener. The 1.125 measurement is to the outside extent of the roof rack black powder coated side rail.
Second, the Tent. Check your fasteners as per below:
4 x M6 hex bolts, washers, and nylock nuts, included with the tent, which mount the tent to the aluminum mounting channel.
4 x M8 hex bolts, washers, and nylock nuts, which allow for the aluminum mounting channel to bolt to the 1 1/2" square aluminum roof rack cross bars.
**It is important also that you have a copy of and or have downloaded a copy of the tent install manual!
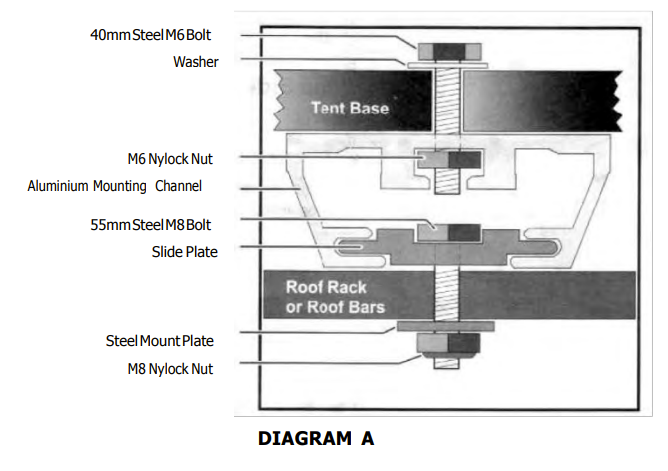
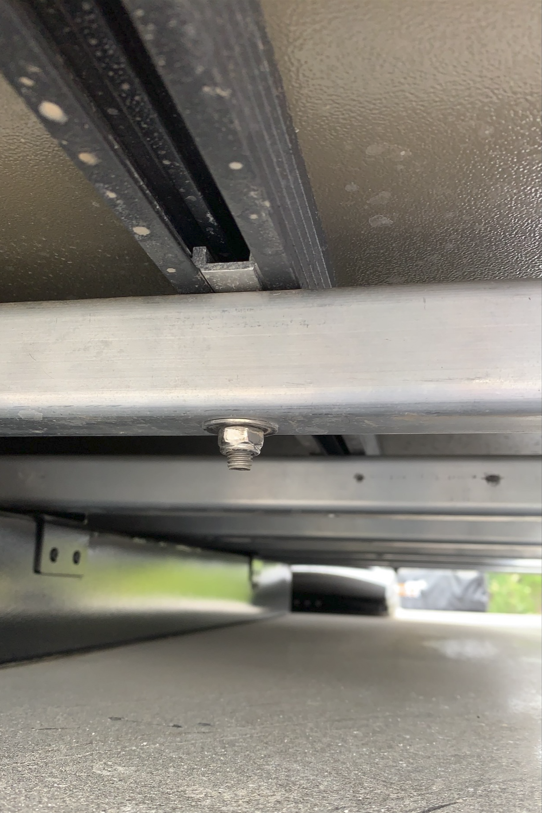
Diagram A as seen above is from the 23Zero tent manual. Below is how we install some tent models as we have pre-drilled holes for specific tents.

With these instructions, you should have no problem mounting your awnings and roof top tents.
If you have any difficulties or questions, we are here to help! Email us at warranty@offgridtrailers.com or give us a call.